Two approaches are discussed here #1. Heat Method #2. Worms Method - though most composts will utilise a mixture of both.
HEAT:
If you have plenty of green waste like grass clippings etc. and the heap will get plenty of sunshine then you can go for the "Heat Method". This means that you are creating a heap that will generate its own heat by macro-organism activity and will be assisted by external heat from sunshine.
WORMS:
If however your heap will be in a reasonable amount of shade and/or you will have more woody type prunings and kitchen scraps then think about going for the "Worms Method".
Here the worms do most of the work in de-composing the waste materials - but there will still be a certain amount of heat generated by the macro-organisms as well.
It is important not to let a Worm Heap get too hot as it would literally broil the worms - so, quite sensibly, they tend to depart to cooler areas.
The Heat Method may well be quicker (and steam a lot) but the Worm Method will be better for the plants as it will contain worm casts (poo) which is the richest form of nutrient known to man.
OTHER IMPORTANT ISSUES
Whether you are buying or building, you should consider the following:-
* Surface. It should be on a level, well drained surface which can be bare earth, treated wooden planks, sleepers or clay pavers - not on concrete as you'll get slurry stains everywhere as it drains.
* Shelter. Ensure some shelter from strong winds and all day intense sun which can dry the heap out. Also avoid putting it under a pine tree as the pine needles are very slow in de-composing.
 * Size. A good Heat heap should ideally be around 1 cubic metre (1 metre wide x 1 metre deep x 1 metre high). This is large enough to retain heat and moisture, but small enough to remain aerated in the center as long as the heap is turned often. Do not build a heap larger as it would be too large to remain aerated in a home compost operation.
* Easy access to add materials. If it’s a long walk down at the bottom of the garden then you’ll probably be deterred to take your kitchen scraps down there every time - and these are a great regular source for topping up a heap. Also if its tucked away in a corner behind your patio then you’ll have to carry all those cuttings across it and you’ll get frustrated that its making a mess. (This may sound fundamental but its surprising how many people get this vital element wrong).
* Water. Any heap, be it a large, open home-made one or a commercial plastic bin, needs to be kept moist. Ensure you can access water easily - a hose with a gentle sprinkle rose is best.
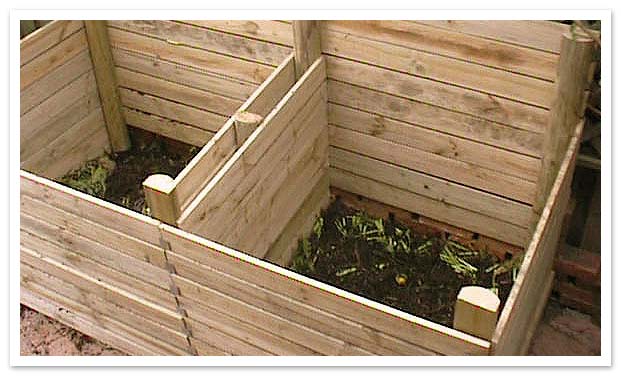
* Ability to turn the heap. At the end of the composting process, the compost will take up only 25 - 40% of the original weight of the heap. However, if you "add as you go", you will have to turn over a sizeable amount of material and you will need room to move. Think about how you would turn the heap by a). stirring with a fork or b). restacking the heap. The side of the heap will be 1 — 1.5 metres tall, so it is best if there is a way to remove one side so you can get at it easily.
* Access to remove finished compost. You’ll also need to have access to the base of the heap in order to remove compost that is ready. You may do this on a regular basis from the bottom of the heap or you may be patient enough to wait until its all ready. * Appearance. If you are going to place the bin where you or your neighbours will see it, you need to make sure its not to unsightly.
* Animal access. Make sure that your heap cannot be accessed by wildlife or pets. Possums, cats and dogs are notorious for rummaging into composts.
* Away from the Veggies. Compost heaps attract slugs and snails so its not a good idea to set one up too close to your vegetable patch.
#1. HEAT METHOD - Carbon vs. Nitrogen
Browns like woody stems, branches etc = carbon.
Greens like grass clippings and leaf materials = nitrogen
All living organisms need a large amount of carbon and a smaller amount of nitrogen in order to survive. This applies to the bacteria that will do the work on your heap. They need a ratio of 30 parts carbon to 1 part nitrogen (by weight) to create an optimal environment for growth and reproduction.
* If you are composting leaves and grass, mix about 60% leaves and 40% fresh grass.
* If you have some fresh materials and some dry materials, gather equal amounts of each.
* If you have both vegetative and animal matter, gather 20% vegetative and 80% animal A
All this growth, reproduction, and decomposing generates heat. The hotter your heap becomes, the faster it decomposes. The closer to 30:1 the ratio gets, the warmer your heap will become.
Preparing the Materials.
Compost heaps can be made without any special preparation, however chopping up woody (carbon) materials, will provide for faster composting.
Chop or shred carbons that are more than 2cms in size. You don't need to shred nitrogens because they are usually soft and will compost quickly anyway. Chopping the size of the particles increases the surface area which bacteria may attack, therefore speeding the decomposition of the materials.
The second benefit of chopping is that it produces pieces which are not uniform in size. A compost heap that has particles of only one size will not compost well because the particles tend to mat together. Matting will decrease the flow of oxygen and moisture through the heap. Oxygen and moisture are two key ingredients to creating compost rapidly.
You can use any tool that makes sense to you - pruners, machete, hatchet, spade, shredders, chippers, or a rotary lawn mower - but watch out for stray bits flying out.
Additional Ingredients
To help your heap along you can add organic fertilizer like blood and bone - the additional nitrogen will help the heap to compost faster.
If you build your heap on paving then consider adding a shovelful of soil per layer to introduce microorganisms to the heap.
If your heap gets a bit smelly - and not all do, though grass rich heaps will pong the most - then sprinkle a little lime over it and fork it in to sweeten it up.
If you live by the sea then gather some seaweed now and again to add to your heap - its incredibly rich in nutrients and will help speed up the process - but bury it into the heap to reduce the odours.
Building the Heap:
* Wet the soil under the heap. This will help prevent the ground from soaking up the moisture from the heap. It will also encourage earthworms to visit if its on bare soil.
* Lay Twigs in the Bottom for Aeration. Lay a 20 cms layer of twigs or other coarse carbons on the bottom of the heap to allow air to circulate at the base.
* Add Nitrogen and Carbon Materials while Adding Moisture. Introduce materials made up of carbon and nitrogen. Add water as you go, remembering that 45 - 50% of the heap by weight should be water. Its best for the materials to be completely mixed, rather than in layers but if you do add by layers just make sure that they are no more than 10-15 cms thick, thinner for fresh grass. This will allow most of the materials to come into contact with one of the adjacent layers. Bacteria will be able to access carbon and nitrogen at the same time. Once you turn the heap the first time, the carbons and nitrogens will be mixed.
* Cover the Heap. Cover the heap with a black plastic garbage bag or tarpaulin to retain moisture or guard against excessive rain. A good heap should be averagely moist — not sodden or dried out. However rolling back the cover during a shower of rain is the best way to keep it moist.
* Check for Heat. It should become hot within a few days. You can use a compost thermometer, although some people just thrust their arm in the heap. Be careful that your arm doesn't get burned. Temperatures of 65°C are good because they will kill pathogens and most weed seeds, although some experts quote lower figures of 60°C and 54°C. If your heap does not reach 48°C to 70°C, you probably do not have enough nitrogen in your heap. Add more nitrogen materials, mix, and monitor again. The minimum temperature for a Heat Method heap should be 45°C. N.B. It doesn't seem to matter how hot your heap gets but Tomato seeds seem to survive regardless. Its an unavoidable by-product of composting that you'll get tomato plants springing up everywhere - but some may consider that a bonus!!.
* Check Moisture. It should be 50% water by weight - but we do not expect you to put it on the bathroom scales!. To check, pick up a handful of materials which should feel like a wrung-out sponge - there should be enough water that it almost, but not quite drips. Usually, the outside of your heap will dry out fairly quickly, particularly the corners if it is square. Just add water.
* Turn the Heap. Turning the heap will decrease composting time and allows all the material to be exposed to the hot centre while increasing aeration. Turn the heap every time its temperature starts to decrease. If you add moisture as needed when you turn it, it should heat up again.
Some people ask if they should turn the heap more often in winter or in summer. Most of the heat comes from bacterial activity, unless you have a black plastic bin then sunshine will play a larger role. Don't forget that the main reason for turning is to add oxygen.
The proper way to turn a heap is to bring all the outside material to the inside of the heap and the inside of the material to the outside. The best way to do this is to have two heaps (or bins) side-by-side so you can fork it from one to another easily.
Alternatively you can just stir it up with a pitchfork - but this is not as effective.
And finally someone saw an opportunity and made a simple and cheap tool to aereate composts - (various models available from the GardensOnline shop).
#2. WORMS METHOD
For this method you can follow most of the instructions for heat — e.g. mix up the materials, cut them up small, add water and turn often, cover it up etc. They are particularly happy when given lots of kitchen scraps (but not animal products like fats).
 This is essentially an open worm farm e.g. they can come and go as they please - but you'll entice them to stay by feeding them lots of kitchen scraps and cellulose (paper and cardboard that is torn up into small pieces).
Egg boxes are perfect for this purpose and provide something solid for the worms to get their digestive juices working.
N.B. be wary though that any paper does not contain too much saturated printing inks which in large quantities are not palatable to the creatures in your compost heap.
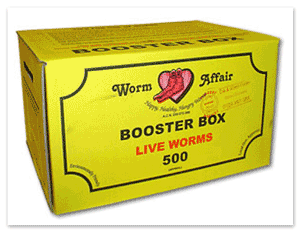
Its best to buy a bucket of worms when you get started and add them to your heap. They come packed in a box as illustrated or a plastic bucket, usually around 500 at a time and they will be quite small and probably red.
Just tip them into your half full heap and keep them moist. In no time you’ll have thousands not hundreds. But you’ll never get to overflow because you’ll spread them around your garden when you spread the compost — but that’s a bonus for your garden.
Basically you should never run out as they breed like . . well, like worms.
N.B. The Worm method is best recommended for those who have plastic compost bins that are in a shady spot.