Its important to not rush children into the
complexities of gardening. Keep it as simple as
possible to start with and most importantly they need to SEE results QUICKLY.
Telling a child that something magic is happening
underground won’t spark much interest unless they can physically see it. It also wont do to tell them to come back in
six weeks time – their attention spans just don’t last that long.
Here are a few ideas to engage kids with that are simple and
require no special equipment. In fact
anyone can do these, even if you live in an apartment
#1. Mustard and Cress Men - quickest
Save a few boiled egg shells, pierce the base with a needle
(for drainage) and place them into an old egg box, or egg cups for
support.
Torn up kitchen paper or cotton wool makes a good medium for
growing so fill each egg shell to three
quarters level then sprinkle some seeds on top - one shell of mustard, one of
cress, one of chives and so on.
Top off
with some more paper or cotton wool and add water – keeping it all on the
draining board initially until the first drainage flow has stopped.
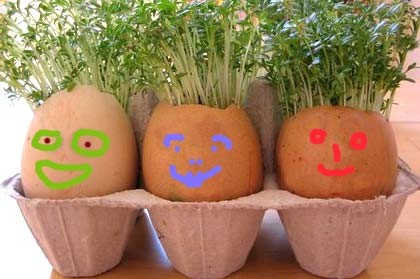
Now place them on the windowsill ensuring they don’t get
day-long sun to bake in, then just wait to see some green sprouts appear –
which could be next morning, or 48 hours max.
A face drawn on the egg shells makes the new growth look
like hair – doubling the fun.
Now the important part is to harvest and eat. This action reinforces the concept and
hopefully will encourage them to try growing other crops.
#2. Propagating Impatiens – relatively quick
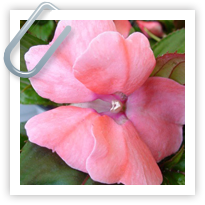 Impatiens – sometimes called balsam or ‘bizzy lizzy’ - are
one of the quickest plant to sprout roots.
There are plenty of different varieties
and the following technique works on any of them.
Impatiens – sometimes called balsam or ‘bizzy lizzy’ - are
one of the quickest plant to sprout roots.
There are plenty of different varieties
and the following technique works on any of them.
Getting Started:
Just snip off a few cuttings from an established plant that
are around 10cms long and remove most of the leaves – from the bottom up. Around four to five small to medium leaves
remaining will be enough to keep it going.
Its also important to pinch out any flower buds – we don't
want the cutting wasting energy flowering when it needs to concentrate on
growing roots.
Hydroponics:
Now take a glass jar or tumbler and cut a piece of cardboard
a little larger than the jar or glass diameter and pierce the centre with a
hole larger than the cutting stem.
Push the stem through and place on top of the glass or jar
with the cutting stem largely underwater.
Place it on the windowsill in indirect light (you don’t want
it to get too hot) and wait to see the new roots start to grow. This shouldn’t take more than about a week to
ten days to see the first new shoots.

Everyday the roots will be clearly seen to be longer and
thicker. Don’t let the container get too
congested before planting out though.
Planting Out:
When its time to pot the new cutting, fill a medium sized
pot with potting mix to about 3/4 full and made a big hole in it with your
finger.
Stand the cutting in the middle, fanning the new roots out
on the soil. Add more potting mix - enough to let the cutting stand up by
itself. Then just firm it gently down and water it in until the soil is
thoroughly wet. Let it drain and then stand it in a saucer.
Hey presto! new potted plant.
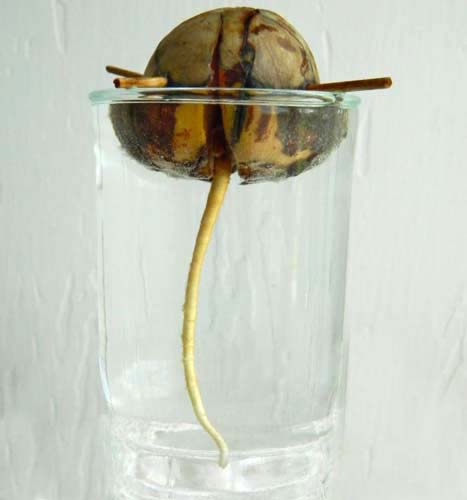
#3. Growing Avocados from a Nut – medium quickish !
 When you’ve finished enjoying an Avocado, take the nut (or
stone) and wash it.
When you’ve finished enjoying an Avocado, take the nut (or
stone) and wash it.
You’ll also need :-
#1. A jam jar or a tumbler with the opening larger than the
Avocado nut.
#2. Three or four toothpicks
#3. Water almost to the top of the jar/tumbler
Getting Started:
Take the toothpicks and push them firmly into the side of
the nut, evenly placed round its girth (widest part). Make sure that the heavier part is downwards
and the (slightly) pointed part is upwards.
Place the nut on top of the jar so the toothpicks hold it
suspended just touching the water. Keep
it on your windowsill in indirect light so as to ensure it doesn’t get too
hot. Top up the water now and again to
keep it at a constant level e.g. keeping the base of the nut wet.
Sprouting:
 Now watch it sprout – the time it will take depends on a lot
of variables. Some shoot quickly, some slowly but you should see something
happen within a week or two at the most.
Now watch it sprout – the time it will take depends on a lot
of variables. Some shoot quickly, some slowly but you should see something
happen within a week or two at the most.
The new roots will reach down into the water and eventually
curl round inside the jar, if you leave it there long enough.
Note: if you want to plant it in the ground you must do so
before the root (the tap root) reaches the bottom of the glass of water. Once
it begins to curl around it will always curl and you won't have a very strong growing
tree.
The tender young shoot that emerges from the top of the nut
will eventually grow into the trunk of a brand new Avocado tree. If you want to
grow it as a Tub Tree you can pinch out the growing tip of new leaves and it
will send out side shoots and be a more interesting shape.
Transferring to a Pot or Tub:
When the sprout is about 20cms high, carefully remove the
toothpicks and plant it into a medium sized pot containing a good quality
potting mix.
Hold the stone near to the top of the pot with the straggly
roots hanging down. Now gently sprinkle the potting mix into the pot swathing
the roots until there is enough to support the stone. Firm the mix down with
your fingers and add enough to almost cover the stone – with the new sprout
standing clear above.
Stand it in a saucer and give it a good soaking, keeping it
on your windowsill for a few more months until it is really well established.
Water it often, but make sure it is well drained.
Planting out:
Don't plant it near the house, or near overhead wires -
Avocado trees can grow to be rather tall. When they are young they don't like
to be in windy, exposed positions and need a bit of shelter.
They also do best if the nut is placed on the top of the
soil (or just under the topsoil) where you'd like them to grow permanently -
that way the tap root (that first straight root which it sends down) can embed
itself firmly in the earth.
Three simple examples of growing plants that can be seen as
it happens – no better way to engage kids and be educational at the same time.