What is Semi-Hydroponics?
To start off, hydroponics is a type of horticulture where plants are grown without soil using a nutrient solution. This frequently entails using pumps to allow nutrient solutions to reach the roots of a plant.
Semi-hydroponics is a form of hydroponics. Instead of having a plants' roots grow in water. In semi-hydroponics, an inert medium is used to wick the appropriate amounts of moisture to the roots.
This method of raising plants was initially developed to grow orchids. However, with time, it has been adapted to many other house plants.
Benefits of Semi-Hydroponics
Less Root Rot
The most frequent mistake made when taking care of succulents is overwatering. This is because, generally speaking, when a plant’s roots sit in waterlogged soil, it promotes root rot.
Root rot, however, occurs mainly because the roots cannot breathe in a water-logged medium. Without proper gas exchange, toxins build up, and the root eventually rots. In semi-hydroponics, the air circulation is abundant, and therefore, root rot does not occur as frequently even though it is being exposed to constant humidity.
Readily Available Moisture
In a semi-hydroponic system, there is always moisture and nutrients available to your succulent. This helps eliminate the stress that succulents go through when they lack moisture or when it is only intermittently available. For this reason, many succulents grow faster in semi-hydroponics.
Disadvantages of Semi-Hydroponics
Needs a Nutrient Solution
Semi-hydroponic setups entirely rely on a proper nutrient solution for the succulent to grow. In soil, organic matter within it helps provide the necessary nutrients for growth. However, in semi-hydroponic setups, the medium is inert, so it cannot provide nutrients to the succulents. Succulents, therefore, entirely rely on the fertilizer solution to meet all their needs.
Requires a Medium
Once a semi-hydroponic system is set up, it can run on auto-pilot. However, it does require a proper set up before it can get to that stage. Keep reading below for my recommended setup, which uses LECA pebbles that are readily available and relatively inexpensive.
Setting Up a Succulent in Semi-Hydroponics System
It is neither difficult nor expensive to set up a semi-hydroponic system, but it does require some planning.
Find a Good Container
Any container with a detachable lid that is longer vertically than it is horizontally will work. I prefer using cylindrical take-out containers. They are inexpensive and very effective. They also require less work to drill a hole into. That being said, some people prefer glass containers because they feel more sturdy.
Spray Paint Your Container (Optional)
Spray painting your container is an optional step. Ever since my first few semi-hydroponic setups, I have always spray painted my containers. This prevents the nutrient solution from being exposed to the sun and thereby prevents algae growth.
However I’ve spoken with many hobbyists who prefer their containers to be clear so that they can see the water level remaining in their containers.
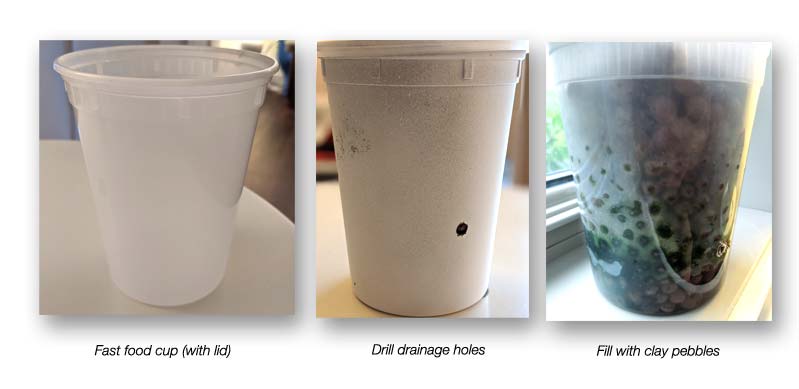
Drill Two Holes
Drill two holes into your container roughly 4-5cms from the bottom of the container. The higher your drill your holes, the longer you can wait before you need to re-water your succulent. Don't make the holes too high – you want the succulents roots to be suspended in the air (surrounded by LECA), NOT sitting in the water reservoir at the bottom.
The water level will only rise to the level of your lowest hole, so you want these holes to be at the same height. I recommend you to measure it out with a ruler.
Prepare Your Medium
I highly recommend buying lightweight, expanded clay aggregates (LECA) sometimes called Aqua Clay Pebbles. Because of the porous nature of these clay pebbles, they can provide great aeration to your plant's roots and wick water upwards in the container. They are inexpensive and can be reused.
Put your LECA pebbles in a vessel and rinse it out with water until you no longer see orange-ish particles in the water. Soak the LECA in water for about 30 minutes and then rinse it out once last time before putting it into your plastic container.
Transplant Your Succulent
This step requires a lot of patience.
As carefully as possible, take your succulent out of the soil that it is growing in. Lightly put its roots under a running tap and try to get rid of as much of the surrounding soil as possible.
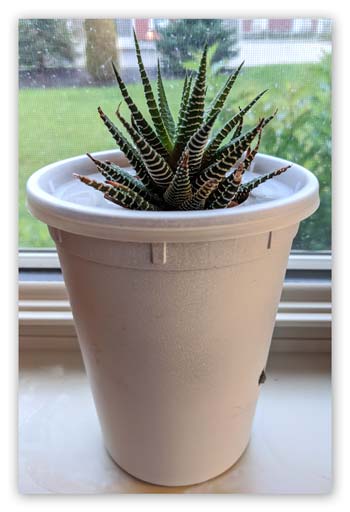
Put your succulent’s roots into the container and lightly surround it with LECA pebbles.
Cut a Hole in Your Container’s Lid
The final step is to cut a slit and a hole in your container's lid so it can surround your succulent. The point of this is to allow for more humidity to remain within the container.
Taking Care of Your Succulent in the Semi-Hydroponic Setup
Once your semi-hydroponic setup is complete, watering is quite simple. Water with an appropriate fertilizer solution whenever the container is dry.
Fill the container rapidly so that the fertilizer solution reaches the top. This will saturate the medium and refill the reservoir as the solution drains down to the level of the drain holes.
Generally speaking, you will be watering once every 1-2 weeks, depending on your ambient humidity and heat.
You can leave your setup inside your house near a window to fulfill your succulent's sun requirements or you can even leave it outside.
Again, no need to worry if it rains as the rain will flush out of the drain holes. This might change the fertilizer solution's actual concentration, but this is okay for short periods.
I would still strive to water your succulent with fertilizer solution once every 1-2 weeks.
Give Your Semi-Hydroponic System Time
After the initial transplant, succulents tend to grow slowly as they adapt their roots to the new environment. Don't fret if you do not see much growth for one month.
After about a month, you should notice that all of a sudden, your succulent will grow rapidly as long as it is receiving the proper amount of sun.
Happy planting!
Click here if you want to learn more about the author, Jeffrey Douglas.